

Gmail Tips and Tricks - 10 things you need to know

Every day you will be spending many hours reading your emails and responding to them. Sometimes you may be doing this for a whole day - sorting, reading, answering, and deleting unwanted emails.
You may be aware of only the basic features of Gmail but there are many hidden Gmail tips and tricks which will help you to spend less time on your emails and accomplish more at the same time.
Now get ready to learn some Gmail tips and tricks which will help you to manage emails effectively, save time, and boost productivity.
10 best Gmail tips and tricks you need to know
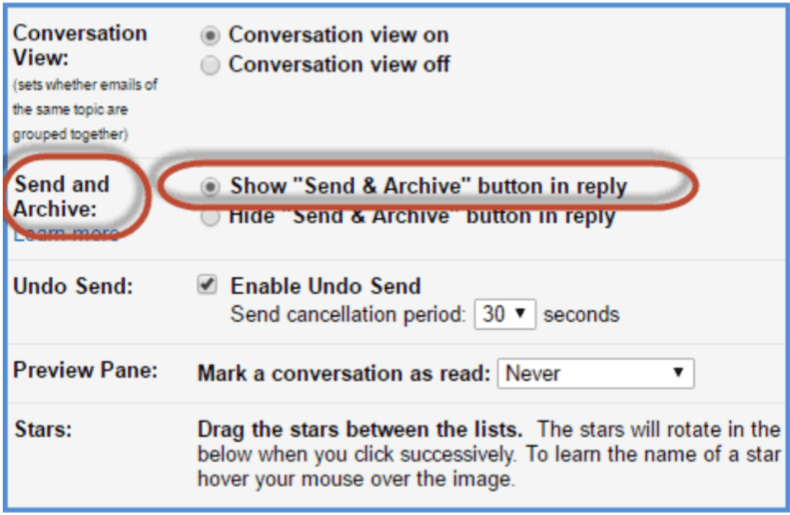
1. Send + Archive in one click
Sometimes you need to archive an email you are planning to send. You feel that the email and the documents attached to it have important data that you may want to refer to in the future.
Furthermore, you may want to archive a reply to an important email you have received. Normally you would do this as a two-step process.
- 'Reply' to the Email.
- Scroll-up and select 'Archive'.

Gmail helps you to save time by allowing you to send a reply and archive the mail in one click with the "Send and Archive" feature.
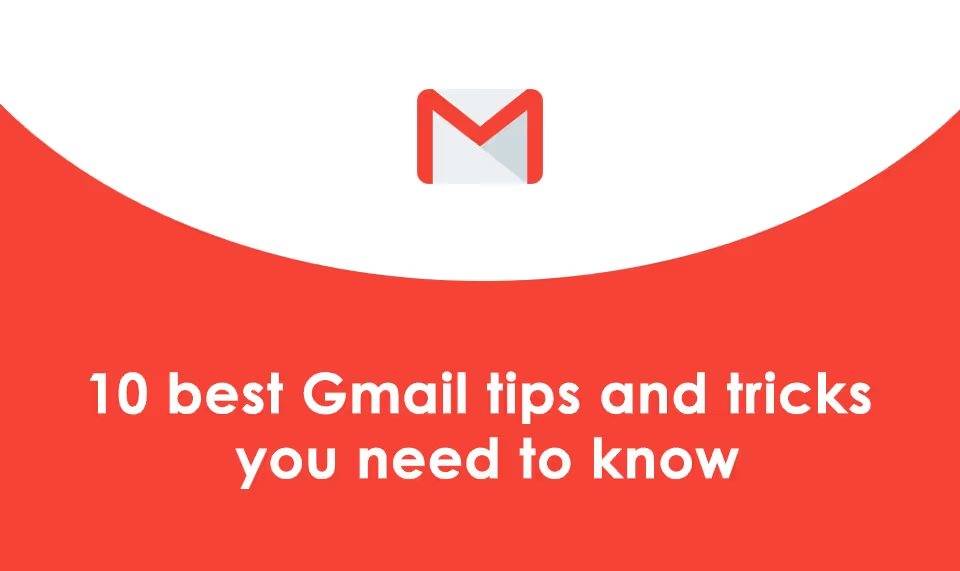
To do this you should first enable the "Send and Archive" feature.
Click the settings gear of your Gmail and select "Settings" from the menu. Select the "General" tab and scroll down, you will find “Send and Archive”.
Now you should select the “'Show' Send and Archive button in reply".
Then scroll down to the bottom and click "Save Changes". Next time when you are replying to an email select "Send and Archive" instead of "Send".
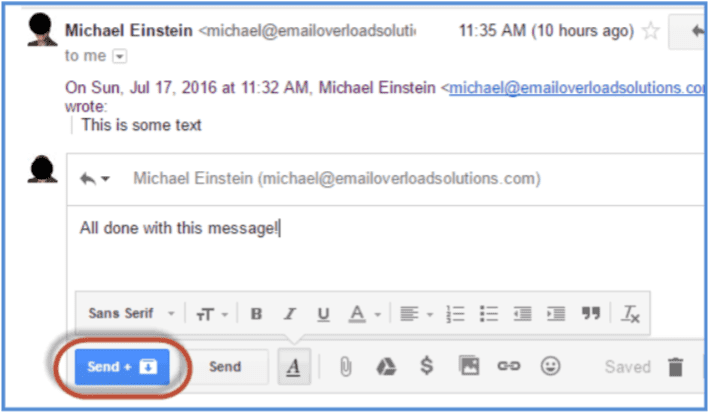
2. Schedule emails to be sent later
You can schedule your emails so that they reach the recipient on a particular day and at the right time. Even if you have composed an email in the middle of the night you can schedule it to be sent at the right time next morning.
When you have composed your email, locate the drop-down arrow near the Send button and click it. Select "Schedule Send" and you will find a menu from which you can choose the date and time at which you want your email to be sent.
Select the time and date and click "Schedule Send". Your email will be sent at the scheduled time.
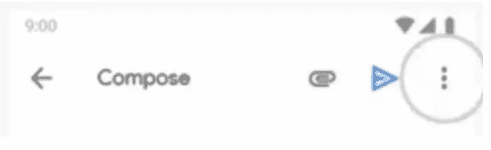
If you are using your smartphone, locate the stacked three dots on the upper right side. Tap the dots and select "Schedule Send" and choose your preferred date and time.
From your Gmail app
If for any reason you don't want to send the scheduled email you can delete it. Go to Menu, select "Scheduled" and choose the email you want to delete and cancel "Send".
3. Undo sent email
In Gmail, you have a quick and easy way to undo a sent email. This simple Gmail trick is very useful when you realize that you have sent the mail to a wrong email address.
To do this you should go to "Settings", click on the "General" tab and select "Enable Undo Send" Now you will be asked to set a "Send cancellation period" which can vary from 5 - 30 seconds.
From Gmail in your browser
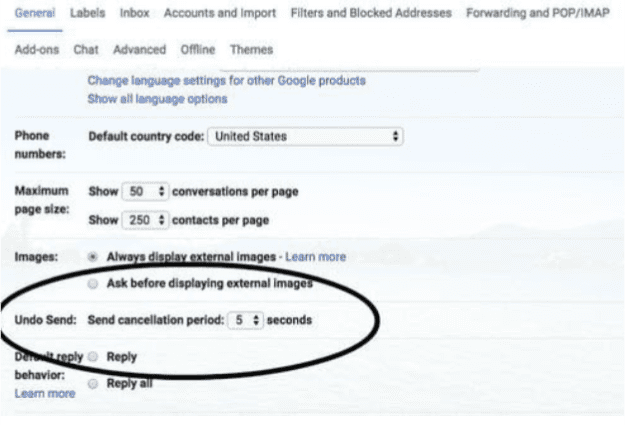
After setting the time you scroll down to the bottom and click "Save changes".
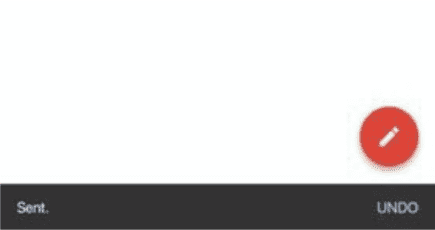
Every time you send an email you will find the "Undo" option, select it whenever you want to undo a sent email. The Undo button will disappear after the cancellation period so you should act fast to undo a sent email.
From your Gmail app
4. Set up canned responses in Gmail
When you are working you may need to send the same or similar emails to different people. This Gmail tip which helps you set up Canned Responses will simplify your work and save time.
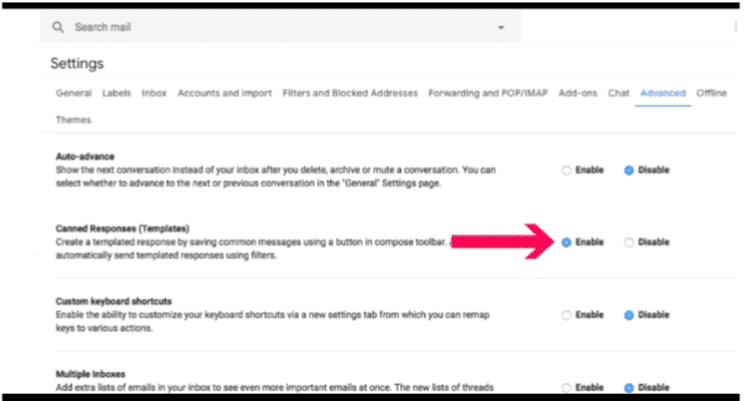
To create Canned responses in Gmail on your desktop first you should enable Canned Responses. To do this you should click the gear icon and select "Settings". Select "Advanced", then you should locate "Canned Responses(Templates)" and click "Enable". Now scroll down to the bottom and click "Save Changes".
You will be taken to your inbox and now you should create your template for a canned response. Compose the email(template) which you want to be used as a canned response.
Click the three dots menu located in the bottom right and to the left of the bin. Select "Canned Responses" and then "New Canned Response".
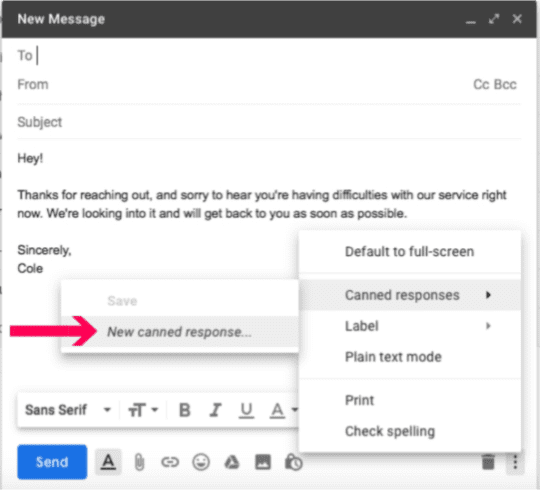
A box will pop up and you will have to name your new canned response. After naming your template click "Save". In a similar way, you can create multiple templates for different purposes.
When you want to insert the canned response in an email click the three dots menu near the bin in the Compose page. Select "Canned Responses" and you will see the list of all the saved email templates.
Now you can select the desired response which you want to insert in your email. The selected canned response will automatically copy and paste in your compose window.
Unfortunately, Canned Responses is not available in the Gmail app. But you can find three pre-written responses at the bottom of all the emails you receive and you can use them to send a quick reply.
5. Move specific emails directly to folders
Gmail has nothing called folders as all the different folders that exist in Gmail are called Labels. Inbox, Outbox, Drafts, Spam, Bin, and all other folders that exist in Gmail are called Labels.
By sending specific emails directly to folders you have your emails organized and you need not search for emails from particular email addresses in the inbox. You can find them easily in the labels/folders.
If you want to move your emails automatically to a folder you need to create a filter to segregate the emails. To create a filter you should click on the small down arrow in the Search field of your Gmail. You will find a "From" field in which you should enter the email address for which you want to create a new label.
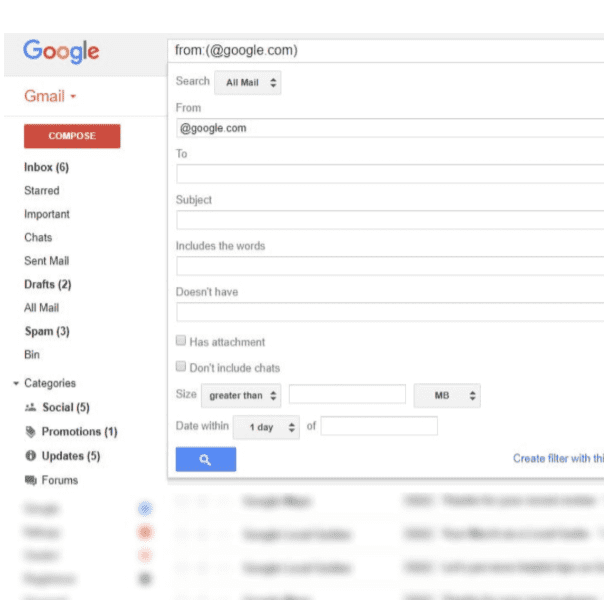
Then you can click "Create filter with this search" and then click "Apply this label". Now you select "New Label" from the drop-down box.
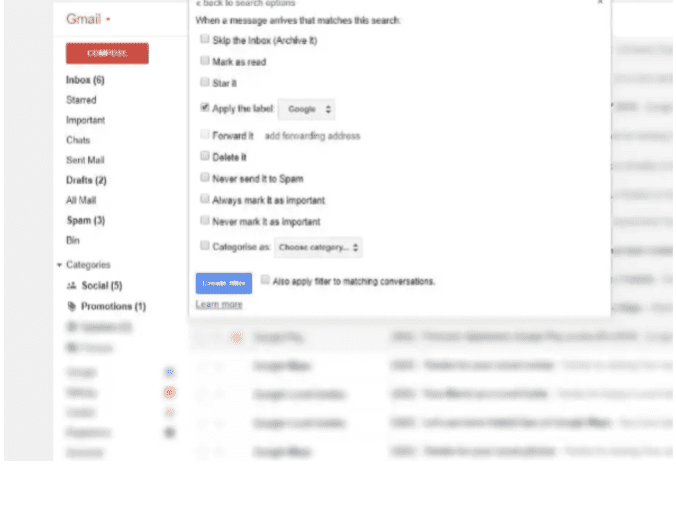
Next, you will have to enter a name for the new label and then click the "Create" button. Once you have created a new label you will find it in the sidebar and it will have all the messages from the specific email address for which you created a filter.
As this feature is not available on the Gmail app you will not be able to move emails directly to folders on your smartphone. But you can set it up on your desktop and it will be available on the Gmail app on your smartphone.
6. Use search operators to search smartly
A simple text entry you make in the Search field of Gmail will fetch you a result with a large number of emails. You can fine-tune your search with advanced search operators like subject line, date range, sender, recipient or any other term mentioned in the emails to make a quick search.
Here you can see how a search operator helps to filter emails during a search.
- subject: searches the Subject line.
- subject: conference - finds all emails with the word conference in the subject line.
- from: sender name/email address
- from: xyz/xyz@gmail.com - finds all emails from xyz/xyz@gmail.com
- from: me - finds all emails you have sent.
- to: recipient's name/email address - finds all emails sent to that particular name/email address directly and not via Cc or Bcc.
- Cc: name/email address - finds all emails sent to that name/email address as a carbon copy.
- Bcc: name/email address - finds all emails sent to that name/email address as a blind carbon copy.
- label: Name of the label - finds all the emails assigned to that label. You should replace all the white space characters in the label with hyphens.
- label: customer- information finds the emails in the label which is named as customer information.
- is: unread - finds all the unread emails
- is: read - finds all the read emails
- has: attachment - finds all emails with attachments
- filename: .doc - finds all emails with .doc attachments.
- after: yyyy/mm/dd - finds all emails you sent or received after the mentioned date
- before: yyyy/mm/dd - finds all emails you sent or received before the mentioned date
To find all emails sent to you by a person within a particular time, in the past month, you can use a date filter like this -
from: ABC olderthan:1m newerthan:2m
To narrow down the search further add another filter
from: ABC olderthan:1m newerthan:2m subject: conference
You can add different search operators to filter and find emails quickly and save your time.
7. Receive emails from other email platforms on Gmail
If you have non-Gmail accounts you can see the emails from these accounts in your Gmail account by linking them to your Gmail.
To do this you have to open the Gmail app on your Android phone or tablet. Go to the menu and click "Settings".
Now you should tap on the non-Gmail account you want to link to your Gmail account. Then tap "Link account".
On the desktop, tap the gear icon and choose Settings. Then you should select " Accounts and Import". In the "Check mail from other accounts" section select "Add a mail account".
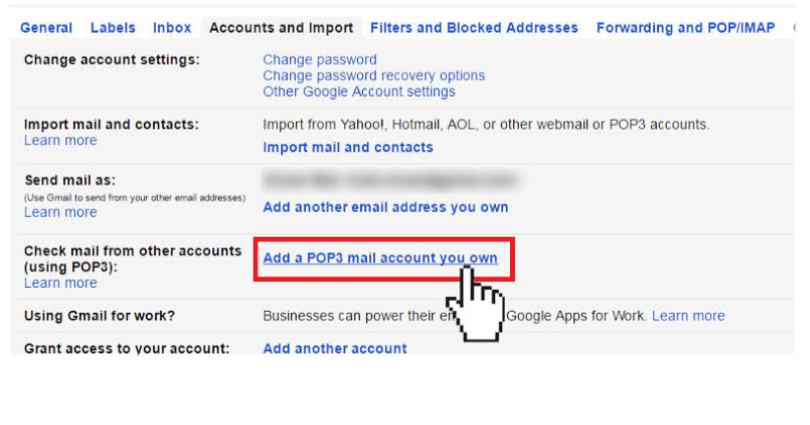
In the pop-up window, type in the email address you want to link, click "Next", and select "Link account with Gmail".
After doing this you will be able to see all the emails from linked accounts in your Gmail on both Gmail app and browser.
8. Snooze emails and read them later
The snooze feature of Gmail helps you to manage your crowded inbox by letting you save an email and read it later. When you snooze an email it disappears from your inbox and pops back to the top of your inbox after the designated time period.
This will remind you to take a look at it and reply to the message. You need not worry about forgetting to reply to an email.
To snooze an email on your computer select the email and when you hover your cursor over it you will see a clock icon on the far right of the subject line. Click on it and you will see an option to select a time period till which you want the email to be snoozed.
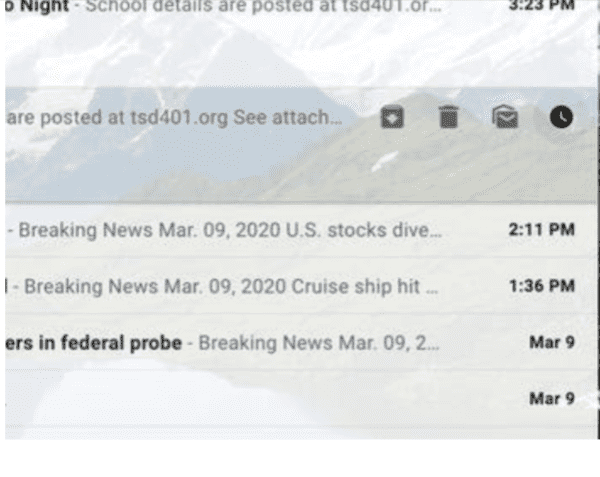
Select a time and the email will disappear from your inbox. You will be able to find it in the Snoozed folder/label in the sidebar.
To snooze an email on your Android device tap and hold on to the email. The search bar will be replaced by a Menu bar which will have three vertical dots in the right end. By tapping on the three dots you will find the option to "Snooze".

You can select the time for which you want the email to remain snoozed. The email will disappear from your inbox and it will reappear after the set time period.
If you want to undo a snoozed email open the Snoozed folder and click " Unsnooze".
9. Enable confidential mode in Gmail
The confidential mode in Gmail gives you control over the emails you send. The recipient will not be able to forward, copy, download, or print the emails sent in confidential mode. You can make it more secure by sending an SMS verification passcode to the recipient to open the email.
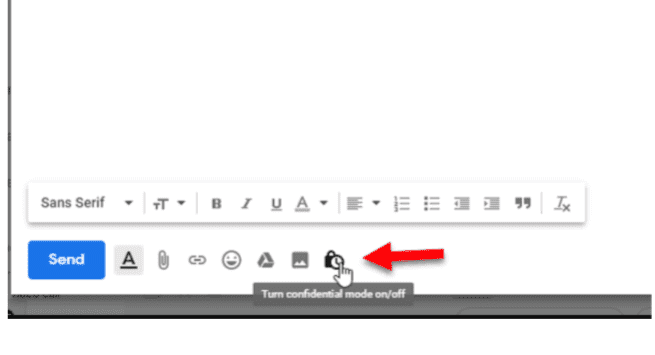
After you compose an email scroll down and you will find the “Turn Confidential Mode On/Off” button in the toolbar at the bottom to the right of the "Send" button.
From Gmail in your browser
Click the button and you will be asked when you want the email to expire and whether you would like to enable SMS verification.
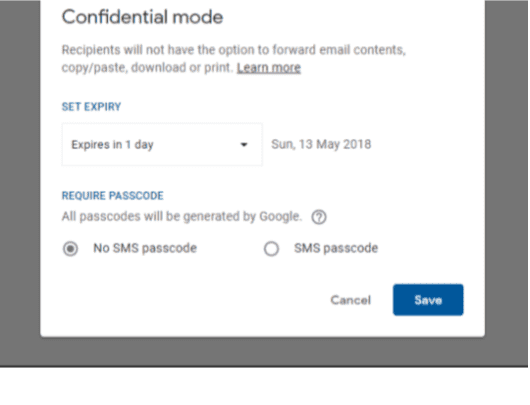
If you enable the SMS feature you will be asked for a phone number, to which an SMS verification passcode will be sent.
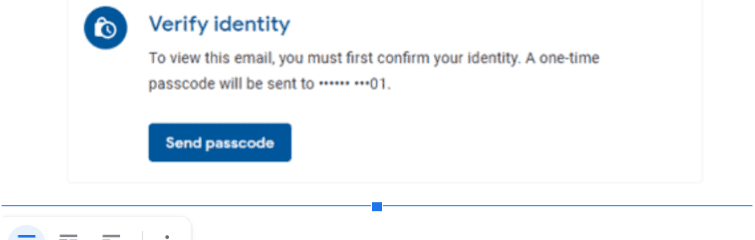
You can send your email and the recipient receives it like a standard email but the text will disappear completely after the email expires.
From your Gmail app

10. Log out from anywhere
This is one of the most useful Gmail tips if you are accessing your Gmail inbox from multiple devices like desktop, tablet, or smartphone and stay signed in to your Gmail account continuously for a long time. Sometimes you might suspect someone else using your account behind your back.
Sometimes you may lose your laptop or phone in which you have not signed out of your Gmail account. Or you may forget to log out of your Gmail account after using it from a public computer.
Gmail's remote logout feature helps you in these situations by allowing you to log out of your account from all logged-in devices at the same time.
Go to your Gmail account and scroll down to the last email in your inbox.
In the right end, you will find "Last account activity" along with "Details". Click "Details" and check if someone else has used your account.
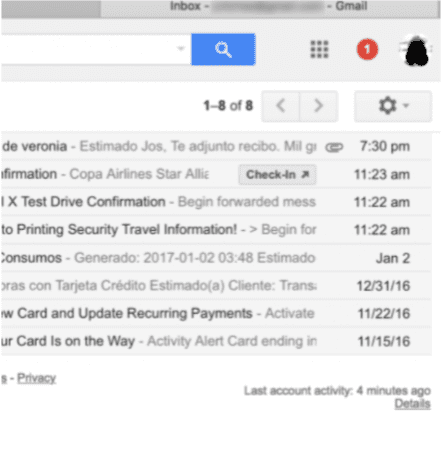
Click "Signout all other Gmail web sessions" and you will be signing out of your Gmail account in all other computers.
If you suspect someone is using your Gmail account through the Gmail app then the only option is to block that device. To do this you select "Security" in your Google account. Scroll down to "Your Devices" and then click "Manage Devices".
Select the device, the one with suspicious activity, you want to be blocked from accessing your Gmail account. Click "Remove" and the device's access to your account will be blocked.
In that case,ContactBook helps you manage Gmail contacts efficiently. Explore the plugin & extension now to save time and increase productivity!
ContactBook’s Gmail Plugin: https://www.contactbook.app/contact-management-gmail-plugin
ContactBook’s Gmail Extension: https://www.contactbook.app/gmail-chrome-extension
Conclusion
All the above mentioned cool Gmail tips and tricks will enhance your Gmail experience and save time. Go ahead and try using these Gmail tips and tricks regularly to keep your Gmail organized and boost productivity.
FAQs
Q. How can I organize my inbox in Gmail?
A. You can organize your inbox in Gmail by using labels, filters, and folders. Labels allow you to tag your emails and filter them based on the label. Filters automatically apply a label to incoming emails based on specific criteria. Folders help you keep your emails organized by moving them to different folders.
Q. How can I set up canned responses in Gmail?
A. You can set up canned responses in Gmail by going to Settings > Advanced > Canned Responses. Then, click on Enable and save the changes. Now, when you compose a new email, you can select the canned response option to insert pre-written responses.
Q. How can I customize my Gmail inbox?
A. You can customize your Gmail inbox by selecting the "Settings" gear icon in the top right corner and selecting "Configure inbox." From there, you can choose which tabs to show, like Primary, Social, Promotions, and more. You can also choose which emails to display, like unread, starred, or important.

.png)